The First Cut of Profit
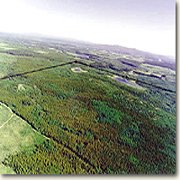
I have purchased hundreds of properties all over British Columbia, with various resources on them, such as timber, gravel, hay, or even peat moss. But I never buy raw land without first obtaining air photos of the property.
Air photos are the single most important source of information you could possibly have when purchasing a parcel of land. They are obtained through the BC government on BC Online. Should you not wish to order online, Land Data BC has a list of approved air photo agents on it website. Most areas of BC are covered by air photos that are less than 10 years old, with larger areas covered by medium scale photos taken from 1996 to the present.
When purchasing air photos, try to obtain the most current photo of the property and area. Also compare the scales of the photo. A large-scale photo (ie. 1:2500) is usually taken at 4-5,000 feet, and will provide a more detailed picture, but the area covered is less then at a smaller scale. A small-scale photo (ie. 1:60,000) is taken at 30-35,000 feet and will provide a larger area, but with less detail than a large-scale photo. I recommend photos in the middle range (1:15,000) which are taken at 15-17,000 feet.
For some areas, you have the option of ordering coloured air photos. Black and white photos cost $5.90; colour photos cost $8.90.
An air photo allows you to view your property from above. Depending on what size scale you purchase you will be able to see the timber, fields, swamps, buildings, creeks, lakes, rivers, access roads, surrounding properties, and much more
Forest Cover Maps
The next most important item of information that you will need is a forest cover map. Each map represents an 11.2 km x 14.6 km area. These maps are interpreted from air photos and already have all the typing and interpretation completed. This map will interpret exactly what the air photo shows you, but the codes on the map are explained and easy to read through a legend at the bottom of the map.
While the legend may look complicated, it is not difficult to interpret. A code is shown on each map. For example, a block of land on a forest cover map with the following notation:
86
SPl(At)
7415-16
would designate that the piece of land in block 86 had spruce and lodgepole pine trees as the major species on the property with a few aspen trees, the trees were between 121-140 years old and were 28.5-37.4 metres tall, they were all mature, had the crown closure of 5, which means that the percentage of the ground covered by the vertically projected crowns of the trees would be 46-55 percent, and a site index of 16, which means that in about 50 years, trees in this area would be able to grow up to 26 meters above an average person's breast height.
These maps are available through Clover Point Cartography in Victoria. Each regular, waterproof map costs $10, plus shipping charges, and the maps will be shipped out to you by the next business day.
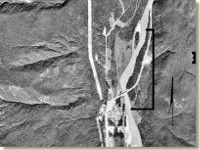
One way to determine what type of timber is on your property is to take your existing air photo and enlarge it. Compare your air photo to your forest cover map. Using a pigment liner, draw a line around each of the different stands of trees, and then determine how many acres of each type you have by using the dot system. So you might end up with four types of timber on your air photo, labeled 1, 2, 3, and 4. The maps with the types and classification will interpret air photo.
 Using a stereoscope
Another way to determine the type of timber is to buy two air photos. Having two of these photos allows you to use a stereoscope, which is a device that brings the area in the photos into a three-dimensional concept. Doing this makes the distingushing features of the property more visible. the mountains become higher, the valleys become deeper and even the height of the trees become apparent. Once you become familiar with a stereoscope, seeing the entire property becomes simple. Order two taken on the same flight path side by side. These photos will overlap by 60 per cent and, when looking through the stereoscope, will give you the three-dimensional effect. While this is a more accurate method, it is also more expensive and it takes some practice to be able to use it properly.
Stereoscopes can cost anywhere from $27 for a pocket device to $2000 for a desk model. Using the stereoscope and your forest cover map, mark and classify the different types of trees, then mark the fields, buildings and access roads.
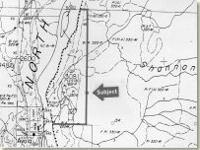
Old surveyor maps
Another useful tool to help establish landmarks, or even to find your property, is the original surveyor's notes. They are the best-kept secret when looking for a piece of property. In 1874, the Federal Free Homestead Act allowed settlers to buy their homesteads from the Crown for about $1 an acre, if they cleared, fenced, and resided on the land for three years. After the homesteader found a parcel of land he wished to homestead he would request a surveyor to come out and formally define his boundaries. The surveyor would first establish the corner post and then the boundaries. He would put in four corner posts with three bearing trees for each corner post. He would also blaze the trees on all four boundaries. As he was establishing the corner posts and boundaries, he would keep very detailed notes and produce a report, including a hand-drawn map of the property. These notes are still kept in Victoria and you can request copies of them from the Surveyor General's office.
These notes can turn out to be invaluable when you go to look at your property, especially if the corner post no longer exists. Using these notes, you can determine where the corner posts of the property were originally set, and re-walk the property lines to make sure you are on the right property.
Field Inspection
Before conducting a field inspection, you must be able to determine how to find your boundaries and corner-posts. When the surveyors originally surveyed parcels of land in BC for the early homesteaders they used a compass and a chain. A chain is a measuring device that used to be made out of metal, now nylon, and is usually about 300 feet long.
One chain equals 66 feet. The surveyor would measure his distances by stretching the chain along the ground measuring four chains at a time. One useful fact to know is that the majority of properties in BC are 40, 80, 160, or 640 acres. So if we take 160 acres, the property would measure 2,640 feet by 2,640 feet, or 40 chains by 40 chains.
 Chains are still used to measure property today, with the hip chain being my favorite tool to measure distances
Combining your map and hip chain with your air photo, you can walk directly to whatever part of a property you want to inspect. I have known people that would tie the hip chain the their car so that they could follow it back and not get lost.
Now that you are on the property and in the type 1 timber on the air photo, you do a plot. Measure out with your chain 66 feet by 132 feet and mark it. In this area, count how many trees, the species and average diameter and height. One way in which I measure height is to put my knife in the tree at the level of my head and hang my hat on it. I then stand back and estimate how many times the I could fit the distance between my knife and the ground up to the top of the tree. Since I know that I am six feet tall, I use this to determine the height of the tree. Once you have all the information in this 66 x 132 foot plot, multiply everything by five. This number will determine the average trees per acre of that type Continue this process for each of the different types on your air photo.
Now you know how many trees per acre you have, their height, diameter, and different species of trees that are on your property. With this information, you can do three things.
First, you could determine the volume of timber on your property yourself. Follow the logging trucks, or find one that is parked. Then count how many trees are on that truck. The average six-axle logging truck averages about 43 cubic meters of a typical spruce or pine tree run. Relate that to your field report by dividing the truck loads into trees per acre, then multiply that 43 (cubic meters) which will give you the cubic meters per acre. Multiply that number by the amount of acres to get a rough volume.
Second, to be more accurate on the amount of timber in your property, take your information to a sawmill close to the property and they will calculate the volume of timber for you and possibly set a price on how much it is worth.
Third, go to a forestry consulting firm with your two air photos and for a small fee, they will interpret the volume and species of timber by using a stereoscope.
Telephone: 604-606-7900 | Email: sales@niho.com
Copyright © 2012 Niho Land & Cattle Company. All rights reserved. | Privacy Policy | Terms of Use | Webmaster